A version control system allows you to store different versions of your code as you make changes. This allows you to avoid losing your changes, and access your code from a convenient location on the internet. You can keep some changes separate in its own branch, and merge those changes into the master branch when you’re ready, so the main version of your code is unaffected until you know your changes function properly. In case you’re unfamiliar with the term “branch”, picture it as a particular version of your entire project. Let’s say you’re working on a book, and you have a published version, and a “work in progress” version. You are rewriting a chapter of your book in the “work in progress” section, but you still have the published version separate, so if you want to print out a copy of your book without the partially modified chapter, you can. When you’re done modifying that chapter, you can merge in your changes to the published version, deleting the modification branch afterward. You could also have a permanent “student edition” branch that has more detail, and perhaps exercises at the end of each chapter. You can easily merge the same changes into that branch to keep it up to date, but maintain a separate copy.
I haven’t been particularly inspired by any version control system until I dove into Git, created by the founder of Linux, Linus Torvalds. If you’re already familiar with Git, feel free to skip the tutorial sections. I’m going to go over the following:
Tutorial
So you’re, in whatever programming language, going to start a new project, and you want to use version control? I’m going to just create a silly, sample application in Scala that’s very easy to understand, to demonstrate. I’m going to assume you’re familiar with your operating system’s command-line interface, and that you’re able to write something in the language of your choice.
Setup
Github is one of the go-to places to get your code hosted for free. It gives you a home for your code, that you can access from anywhere. Initial steps:
- Go to http://github.com and “Sign up for Github”
- You’ll need Git. Follow this page step by step: http://help.github.com/articles/set-up-git
- This explains how to create a new repository: https://help.github.com/articles/create-a-repo
- Lastly, you’re going to want to get used to viewing files that start with a “.” These files are hidden by default, so at the command line, when you’re listing contents of a directory, you need to include an “a” option. That’s “ls -a” in OSX and Linux, and “dir /a” for Windows. In your folder options, you can turn on “Show hidden files and folders” as well.
Once you got that far, there’s nothing stopping you, outside of setting aside some play time, from using everything git has to offer.
Clone a Repository
Cloning a repository lets you grab the source code from an existing project that you own, or someone else’s project that you have access to (usually public). Unless it’s your project, you won’t be able to make changes, so you’re going to “fork” my potayto project, which means to create your own copy of it under your own account, then you can modify that to your heart’s content. I keep all of my projects locally (on my computer) in a “projects” folder in my home directory, “/Users/sdanzig/projects”, so I’m going to use “projects” for this demo.
First, fork my repository…
I created a sample project on github, as you now should know how to do.
Let’s get this project onto your hard drive, so you can add comments to my source code for me!
First, log into your github account, then go to my repository at https://github.com/sdanzig/potayto … Click “Fork”:
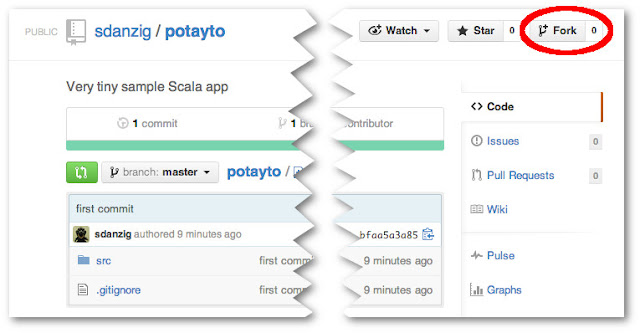 |
| Fig. 1 |
Then select your user account, to copy it to. At this point, it’s as though it were your own repository, and you can actually make changes in the code on github. We’re going to copy the repository onto our local hard drive, so we can both edit and compile the code there.
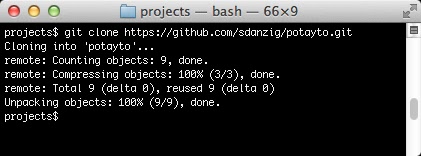 |
| Fig. 2 |
Folder structure
There are a few key things to know about what git is doing with your files. Type:
cd potayto
There are a couple things to see here. List the contents in the potayto folder, being careful to show the hidden files and folders:
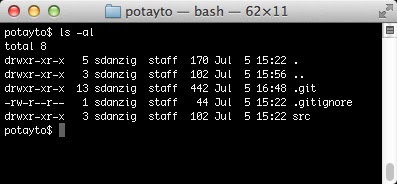 |
| Fig. 3 |
The src folder has the source code, and its structure conforms to the
Maven standard directory structure. You’ll also see a .git folder, which contains a complete record of all the changes that were made to the potayto project.the potayto repository and also a .gitignore text file. We’re not going to dive into the contents of .git in this tutorial, but it’s easier to understand than you think. If you’re curious, please refer to the
online book I mentioned earlier.
git log
A “commit” is a change recorded in your repository. Type “git log”, and you might have to press your space bar to scroll and type “q” at the end, to quit displaying the file:
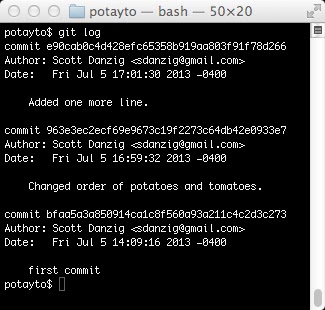 |
| Fig. 4 |
Git’s log shows the potayto project has 3 commits so far, from oldest on bottom, the first commit, to most recent on top. You see the big hexadecimal numbers preceded by the word “commit”? Those are the SHA codes I was referring to. Git also uses these SHA codes to identify commits. They’re big and scary, but you can just copy and paste them. Also, you only need to type enough letters and numbers for it to be uniquely identified. Five should be usually enough. For this project, you can get away with 4, the minimum.
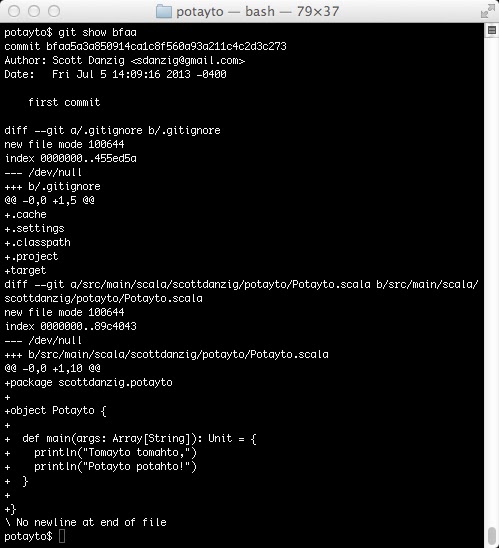
Let’s see how my first commit started. To see the details of the first commit, ype:
git show bfaa
 |
| Fig. 5 |
Initially I checked in my Scala application as something that merely printed out “Tomayto tomahto,” “Potayto potahto!” You can see that near the bottom. The “main” method of the “Potayto” object gets executed, and there are those two “print lines”. Earlier in the commit you can see the addition of the .gitignore I provided. I’m making git ignore my Eclipse-specific dot-something files (e.g. .project) and also the target directory, where my source code get compiled to. Git’s show command is showing the changes in the file, not the entire files. Those +’s before each line mean the lines were added. In this case, they were added because the file was previously non-existant. That’s why you see the /dev/null there.
Now type:
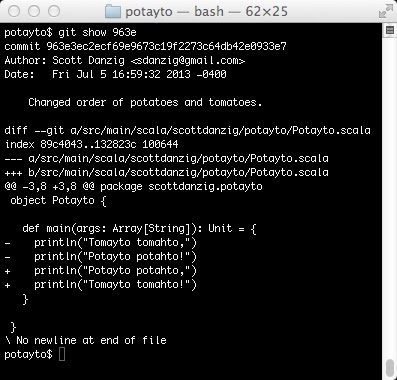
git show 963e
 |
| Fig. 6 |
Here you see my informative commit message about what changed, which should be concise but comprehensive, so you’re able to find the change when you need it. After that, you see that I did exactly what the message says. I changed the order of the lyrics. You see two lines beginning with “-“, preceding the lines removed, and two lines beginning with “+”, preceding the lines added. You get the idea.
The .gitignore File, and “git status”
View the .gitignore file.
.cache
.settings
.classpath
.project
target
This is a manually created file that tells git what to ignore. If you don’t want files tracked, you include it here. I use software called Eclipse to write my code, and it creates hidden project files which git will see and want to add in to the project. Why should you be confined to using not only the same software as me to mess with my code, but also the same settings? Some teams might want to conform to the same development environments and checking in the project files might be a time saver, but these days there are tools that let you easily generate such project files for popular IDEs. Therefore, I have git ignore all the eclipse-specific files, which all happen to start with a “.”
There’s also a “target” folder. I’ve configured Eclipse to write my compiled code into that folder. We don’t want git tracking the files generated upon compilation. Let those grabbing your source code compile it themselves after they make what modifications they wish. You’re going to want to create one for your own projects. This .gitignore file gets checked in along with your project, so people who modify your code don’t accidentally check in their generated code as well. Others might be using Intellij, which writes .idea folders and .ipr and .iws files, so they may append this to the .gitignore, which is completely fine.
Let’s try this. Type:
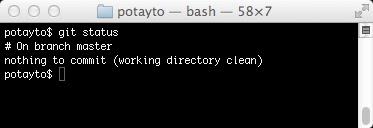
git status
 |
| Fig. 7 |
You’ll see you’re on the main branch of your project (a version of your code), “master”. Being “on a branch” means your commits are appended to that branch. Now create a text file named “deleteme.txt” using whatever editor you want in that potayto folder and type “git status” again:
 |
| Fig. 8 |
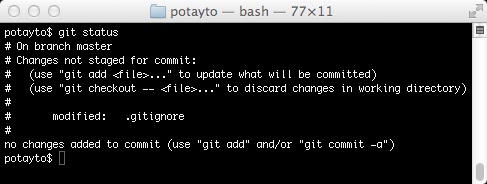
Use that same text editor to add “deleteme.txt” as the last line of .gitignore and check this out:
 |
| Fig. 9 |
See, you modified .gitignore, so git doesn’t see your deleteme.txt file. However, other than this nifty feature, .gitignore is a file just like any other file in your repository, so if you want this “ignoring” saved, you have to commit the change, just like you would commit a change to your code.
Staging Changes You Want to Commit
Here’s one of the fun things with git. You can “stage” the modified files that you want to commit. Other version control systems ominously await your one command before your files instantly changed in the repository, perhaps the remote repository for the entire team.
Let’s say you wanted to make a change involving files A and B. You changed file A. You then remembered something you’d like to do with file Z, on an unrelated note, and modified that before you forgot about it. Then you completed your initial change, modifying file B. Git allows you to “add” files A and B to staging, while leaving file Z “unstaged”. Then you can “commit” only the staged files to your repository. But you don’t! You realize you need to make a change to file C as well. You “add” it. Now files A, B, and C are staged, and Z is still unstaged. You commit the staged changes only.
Read that last paragraph repeatedly if you didn’t follow it fully. It’s important. See how Git lets you prepare your commit beforehand? With a version control system such as Subversion, you’d have to remember to make your change to file Z later, and your “commit history” would show that you changed files A and B, then, in another entry, that you changed file C later.
We won’t be as intricate. Let’s just stage our one file for now. Look at Figure 9. Git gives you instructions for what you can do while in the repository’s current state. Git is not known for having intuitive commands, but it
is known for helping you out. “git checkout – .gitignore” to undo your change? It’s strange, but at least it tells you exactly what to do.
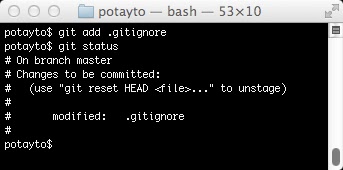
To promote .gitignore to “staged” status, type
git add .gitignore
 |
| Fig. 10 |
The important thing to note here is that now your file change is listed under “Changes to be committed” and git is spoon-feeding you what exactly you need to type if you want to undo this staging. Don’t type this:
git reset HEAD .gitignore
You should strive to understand what’s going on there (check out the Pro Git book I linked to for those details) but for now, in this situation, you just are given means to an end when you might need it (changing your mind about what to stage).
By the way, it’s often more convenient to just type ”
git add <folder name>” to add all modifications of files in a folder (and subfolders of that folder). Also very common to type is ”
git add .”, a shortcut to stage all the modified files in your repository. This is fine as long as you’re sure you’re not accidentally adding a file such as Z that you don’t want to be grouped into this change in your commit history.
It’s also useful to know how to stage the deletion of a file. Use “git rm <file>” for that.Committing Changes to Your Repository
Guess what? We get to do our first commit! Time to make that .gitignore change official. Type:
git commit -m “Added deleteme.txt to .gitignore”
 |
| Fig. 11 |
You could just type “git commit”, but then git would load up a text editor, and you’d be required to type a commit message anyway. In OSX and Linux, “vim” would load up, and in Windows, you’d get an error. If you prefer a full screen editor in Windows, you can type this to configure it:
git config –global core.editor “notepad”
 |
Mug available on thinkgeek.com
sporting some vi quick reference.
Vim supports all vi commands listed. |
If you end up in vim and are unfamiliar with it, realize it’s a very geeky and unintuitive but powerful editor to use. In general, pressing the escape key, and typing “:x” will save what you’re writing and then exit. The same syntax will work to choose a new full screen editor in OSX and Linux, of course replacing notepad with the /full/path/and/filename of a different editor.
The full screen editor is necessary if you want a commit message with multiple lines, or in other situations, so if you hate vim, configure git to one you do like.
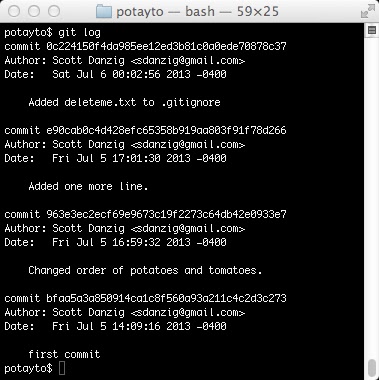
Enough with this babble. Fill that VI mug with champagne – you just made your first commit! If you can contain your excitement, type:
git log
 |
| Fig. 12 |
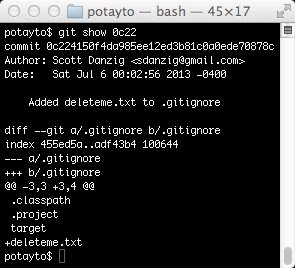
The change on top is yours. Oh, what the heck, let’s take a look at it:
 |
| Fig. 13 |
See the +deleteme.txt there? That was you! The way this “diff” works is that git tries to show you three lines before and after each of your changes. Here, there were no lines below your addition. The -3,3 and +3,4 are ranges. - precedes the old file’s range, and + is for the new file. The first number in each range is a starting line number. The second number is the number of lines of the displayed sample before and after your modification. The 4 lines displayed only totaled 3 before your change.
If you want to revert changes you made, the safest way is to use “git revert”, which automatically creates a new commit that undoes the changes in another commit. Don’t do this, but if you wanted to undo that “deleteme.txt ignoring” commit which has the SHA starting with 0c22, you can type: “git revert 0c22”The Origin
You cloned your repository from your github account. Unless something went horribly wrong, this should be:
https://github.com/<your github username>/potayto.git
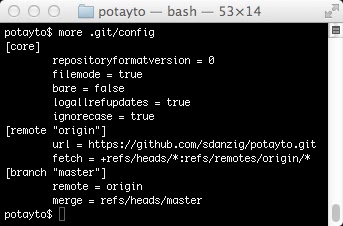
Git automatically labels where you cloned a repository from as “origin”. Remember when I said the internals of a git repository were easily accessible in that .git folder in your project? Look at the text file .git/config:
 |
| Fig. 14 |
It’s as simple as this.
Branches
Before I explain how to make your changes on the version of your code stored on github, I should first explain more about branches. I already explained how a branch is a separate version of your code. A change made to one branch does not affect the version of your repository represented by the other branch, unless you explicitly merge the change into it. By default, git will put your code on a “master” branch. When you clone a project from a remote repository (remote in this case means hosted by github), it will automatically create a local branch that “tracks” a remote branch. Tracking a branch means that git will help you easily determine:
- See the differences between commits made to the tracking branch (the local one) and the tracked branch (remote)
- Add your new local commits to the remote branch
- Put the new remote commits on your local branch
If you didn’t have your local branch track the remote branch, you could still move changes from one to another, but it becomes more of a manual process. Hey, guess what? I can easily demonstrate all this in action! First, type:
git status
 |
| Fig. 15 |
That deleteme.txt ignoring change you made in your local master branch is not yet on Github! You have one commit that Github’s (the origin) remote master branch (denoted as origin/master) does not yet have.
Don’t do this now, but if you don’t want to make changes directly in your local master branch, you can create a new local branch, perhaps named “testing” by typing “git branch testing”. Then you can switch to that branch by typing “git checkout testing”. Then make whatever changes you want, stage and commit them, then switch back to the master branch with “git checkout master”. You could also create and switch to a new local branch in one command, “git checkout -b testing”.Pushing to the Remote Repository
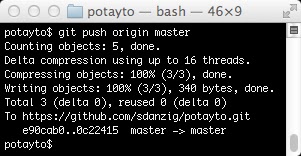
Let’s put your change on Github, then we’ll make a change directly on Github and pull it. Git’s push command, if you don’t provide arguments, will just push all the changes in your local branches to the remote branches they track. This can be dangerous, if you have commits in another local branch and you’re not quite ready to push those out also. (I one time accidentally erased the last week of changes in New York Magazine’s main repository doing this. We did manage to recover them, but, don’t ask.) It’s better to be explicit. Type:
git push origin master
 |
| Fig. 16 |
You don’t really need to concern yourself with the details of how Git does the upload. But as for the command you just typed, git push lets you specify the “remote” that you’re pushing to, and the branch. By specifying the branch, you tell git to take that particular branch (“master”, in this case) and update the remote branch, on the origin (your Github potayto repository), with the same name (it will create a new remote “master” branch if it doesn’t exist). If you didn’t specify “master”, it will try to push the changes in all your branches to branches of the same names on the origin (if they exist there. It won’t create new remote branches in this case).
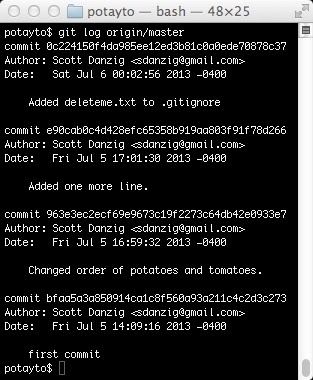
Anyway, if you type “git status” again, you’ll see your branch now matches the remote repository’s copy of it. I’d show you, but I can only do so many screen captures, okay? Also what you can do is type:
git log origin/master
 |
| Fig. 17 |
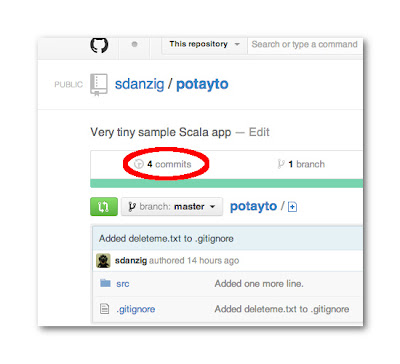
This is the syntax to see a log of the commits in the master branch on your “origin” remote. You can see the change is there. You can also see this list of commits by logging into Github, viewing your Potayto repository, and clicking on this link:
 |
| Fig. 18 |
Pulling Changes from the Remote Repository
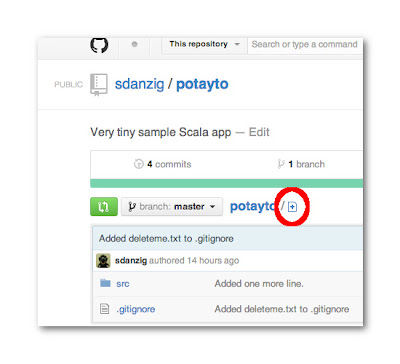
While we’re browsing the Github interface, let’s use it to create a change that you can fetch (or pull). This will emulate someone else accessing the remote repository and making a change. If you want your local copy of the repository to reflect what’s stored in the remote repository, you need to keep yours up to date by intermittently fetching new changes. First, let’s create a README.md file which Github will automatically use to describe your project. Github provides a button labeled “Add a README” for this, but let’s do it the more generic way. Click the encircled “Add a file” button:
 |
| Fig. 19 |
Now type “README.md” for the name and a description that makes sense to you.
The “md” in the filename stands for “Markdown”, which is a “markup language” that lets you augment your text with different things just like HTML does. If you want to learn how pretty you can make your README file, you can learn more about Markdown here, but just realize Github uses a slightly modified version of Markdown.Click the “Commit New File” button:
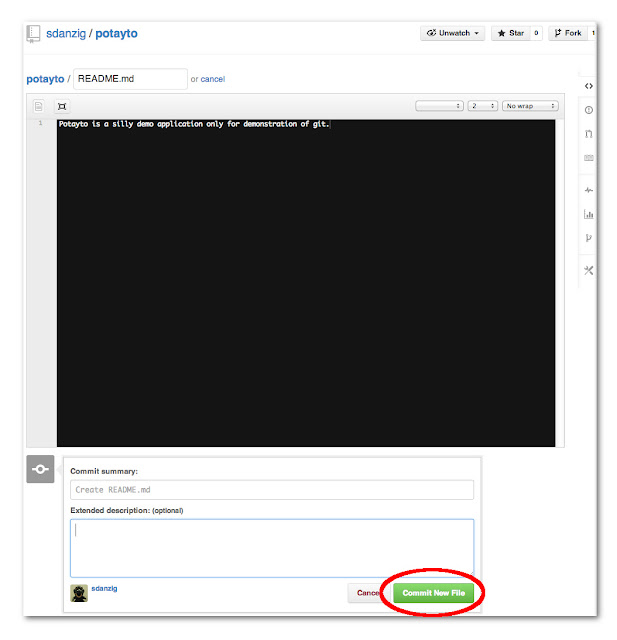 |
| Fig. 20 |
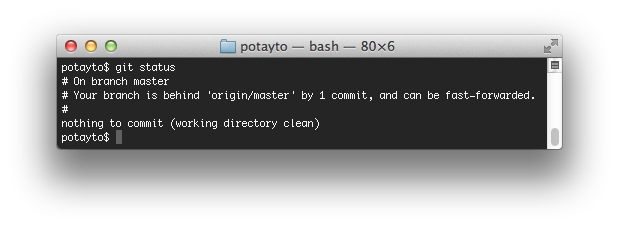
You’ll see your project described as desired. Go back to your terminal window and type:
git status
 |
| Fig. 21 |
Wait a sec… Why’s it saying that your local branch is up to date? It’s because the git “status” command does not do any network communication. Even typing “git log origin/master” won’t show the change. Only Git’s “push”, “pull”, and “fetch” does anything over the network. Let’s talk about “fetch”, as “pull” is just a shortcut of functionality that “fetch” can do.
When you track a remote branch, you do get a copy of that remote branch in your local repository. However, aside from those three aforementioned commands that talk over the network, git treats these remote branches just like any other branches. You can even have one local branch track another local branch. (Probably won’t need to do that.)
So, how do we update our local copies of the remote branches? “git fetch” will update all the local copies of the remote branches listed in your .git/config file. Here, I’ll start adding more shadows to my screenshots, in case you actually aren’t as excited about all this niftiness as I am. Please type:
git fetch
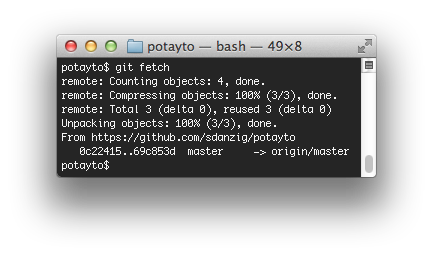 |
| Fig. 22 |
 |
| Fig. 23 |
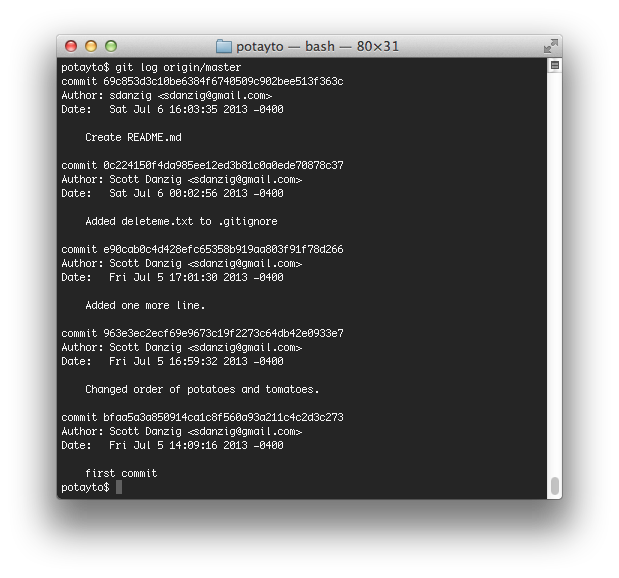
Now, you’ll notice there’s still no difference if you type “git log”, but let’s type:
git log origin/master
 |
| Fig. 24 |
Now you see the remote change. Type:
git status
See, this is more like it, but what does “fast-forwarded” mean? Fast-forwarding is a version of “merging”. It means there’s no potential conflict. It means you took all the changes in a branch, such as the remote master branch, and made changes from there, while no new changes were made in the remote branch. I’ll explain more later, in the section on “rebasing”, but for now, we’re going to pull these changes in. Type:
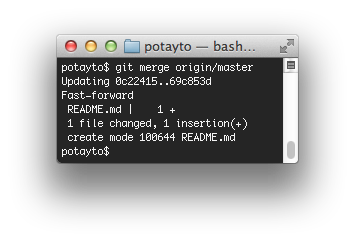
git merge origin/master
 |
| Fig. 25 |
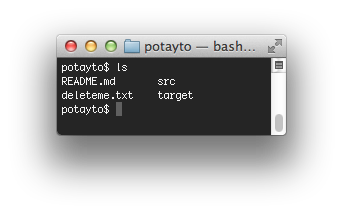
This tells you there was one file inserted. Now if you typed “git log”, you’d see that you brought the change first from the master branch on your Github repository to your origin/master branch, and then from there to your local master branch. You could even have absolute proof of the change by looking in your current directory:
 |
| Fig. 26 |
See the README.md file? Of course, there is a short cut. It’s too late, but you could have done everything in one fell swoop by typing:
git pull origin master
That would have not only fetched the commits from the remote repository, but would also have done the merge. And if you want to pull all of the branches from all the remote repositories that your .git/config file lists, you can just type:
git pull
You can be as trigger happy as you want with that for now, but when you start dealing with more than one branch, you might update some branches you weren’t yet ready to update.
Merges and Conflicts
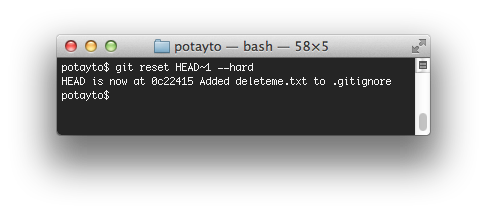
Now for the purposes of learning about merges, we’re going to undo that last merge. Very carefully, type:
git reset HEAD~1 –hard
 |
| Fig. 27 |
The “HEAD~1” means “the 1st commit before the latest commit”, with the latest commit referred to as the “HEAD” of the branch (currently master). By resetting “hard”, you’re actually permanently erasing the last commit from your local master branch. As far as Git’s concerned, the last link in the master branch’s “chain” now is the commit that was previously second to last. Don’t get in the habit of this. It’s just for the purpose of this tutorial.Don’t worry – we don’t have to mess with remote repositories for a while. Your new README.md file is also safely committed to your local repository’s cached version of the remote master branch, “origin/master”. You
could type “git merge origin/master” to re-merge your changes, but don’t do it right now.
Let’s say someone else added that README.md, and you were unaware. You start to create a README.md in your local repository, with the intention of pushing it to the remote repository later. Because we undid our change, there is no longer a README.md file in your current directory.
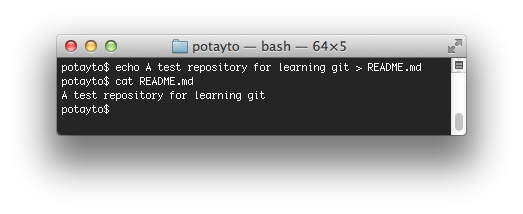
Normally you’d use a text editor, but for now, type this to create a new README.md file:
echo A test repository for learning git > README.md
 |
| Fig. 28 |
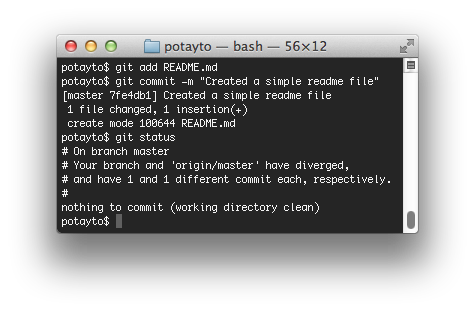
I used the cat command (For Windows, it’d be “type”) to display the contents of the simple file we created. Let’s stage and commit the thing. Type:
git add README.md
then type:
git commit -m “Created a simple readme file”
and finally:
git status
 |
| Fig. 29 |
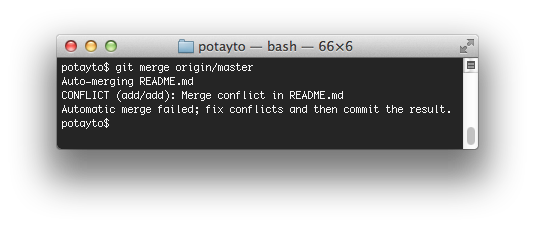
Now we have two versions of a README.md file committed. You can see that your origin/master branch is one commit in one direction, and your master branch is one commit in the other direction. What will happen when I try to update master from origin/master? Let’s see! Type:
git merge origin/master
 |
| Fig. 30 |
Just as you might think, git is flummoxed. This is essentially Git saying ”
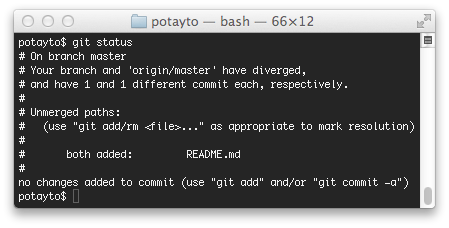
You fix it.” Let’s see what state we’re in. Type:
git status
 |
| Fig. 31 |
Can’t be any clearer, except for one detail. Git
is telling us to type “git add/rm whatever” to “mark resolution. That means, in order to fix this, you could take one of two routes.
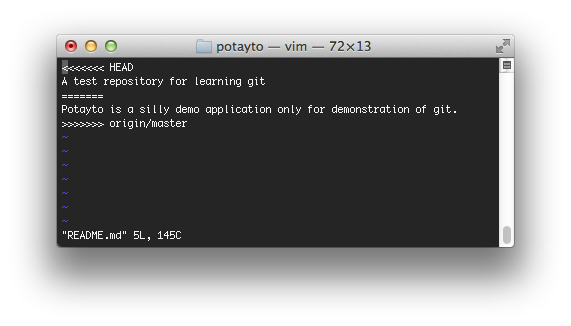
DON’T DO THIS! … You could go into README.md, fix it up, then stage it with git add. Edit the README.md file. I’ll use vim, but you use whatever editor you want:
 |
| Fig. 32 |
You can see that the two versions are marked very clearly. HEAD represents “the current local branch you’re on”, which is master. If you review all the times you’ve typed “git status”, it’s told you that you’re on branch “master”. And we know “origin/master” is our local copy of the remote repository’s master branch. I’m going to remove the scary divider lines (e.g. <<<<, ====,>>>>) and replace those two versions of project descriptions with a new one:
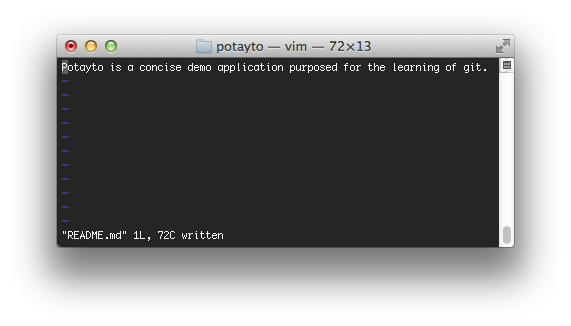 |
| Fig. 33 |
If you ignored my warning and you’re doing this, don’t save! Just exit out! But if you were doing this, you could save and exit, then “git add” the file, then “git commit”, to stage and commit. It’s actually better in some ways, because you’re able to rethink each change, and perhaps reword something like I was about to do for this README file.
However, the reason I told you not to do this is because it’s the hard way, especially for complicated conflicts. Instead, while still in your project directory, having just experienced a failed merge command, type:
git mergetool
 |
| Fig. 34 |
Mergetool will guide you through each conflicted file, letting you choose which version of each conflicted line you’d like to use for the committed file. You can see, by default, it will use “opendiff”. Press enter to see what “opendiff” looks like:
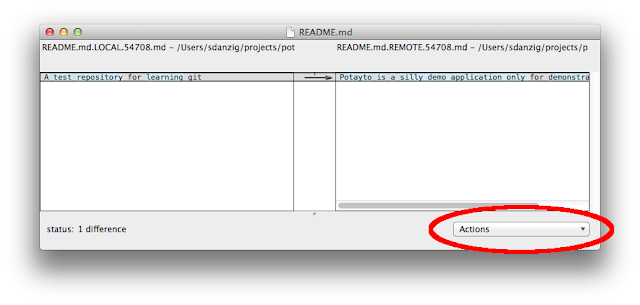 |
| Fig. 35 |
If this were more than one line, you’d be able to say “use the left version for this conflict line”. Or “use the right version for this line”. Or “I don’t want to use either line.” In this case, we only have one conflicted line to choose from, so make it count! The one conflicted line is selected. Click on the “Actions” pull down menu and choose “Choose right”. You’ll see nothing changed. That was because that arrow in the middle was already pointing to the right. Try selecting “Choose left”, then “Choose right” again. You’ll see what I mean. Opendiff doesn’t give you the opportunity to put in your own custom line. You can do that later if you wish.
At the pull down menu at the top of the screen, select “File” then “Save Merge”:
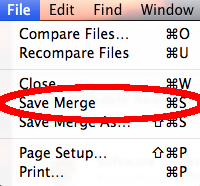 |
| Fig. 36 |
Go back to the menu and select “Quit FileMerge”. Now again type:
git status
Select the line then
Let’s stage the new version of the readme file. Type:
git add README.md
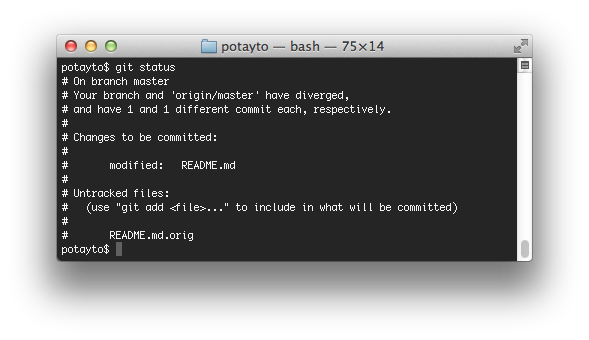 |
| Fig. 37 |
All set to commit changes, just like if you manually modified and staged (with “git add”) the files yourself. Now type:
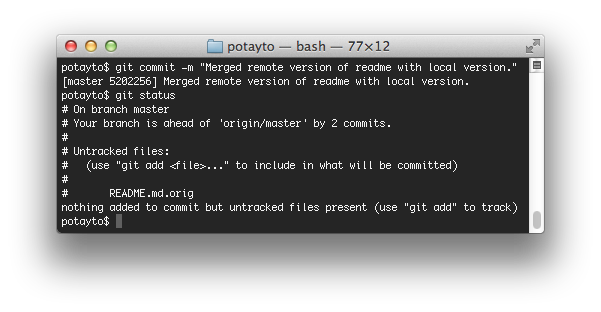
git commit -m “Merged remote version of readme with local version.”
and then:
git status
 |
| Fig. 38 |
Before we go on, if you noticed, there’s a lingering “README.md.orig” file. That’s just a backup in case the merged file you came up with looks horrible. However, it’s a pain to deal with these “orig” files. For this time, you can move the file somewhere, or just delete it, but, check out
this page on many strategies you can leverage to deal with those files.
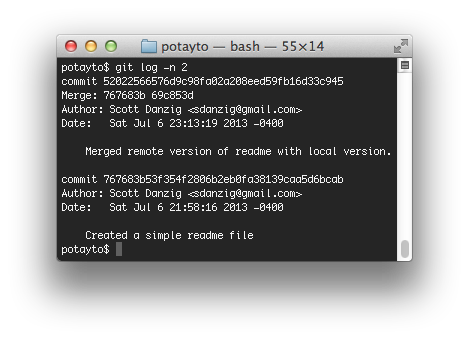
Back to the merge. Look! Your branch is “ahead” of “origin/master” by 2 commits. Let’s see what those commits are. To show just the last two commits, type:
git log -n 2
 |
| Fig. 39 |
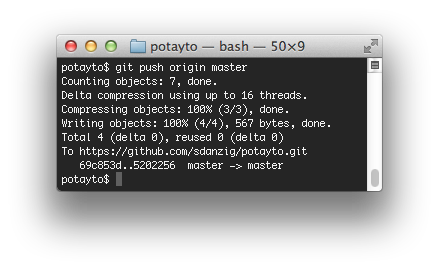
The earlier commit on the bottom is the one you did before, to create your local version of the readme file. The top commit is the “merge commit”, that Git uses to identify where two branches were merged. Now review what state “origin/master” is in with “git log origin/master”. We want our merged version of the readme to Github. Yes, we’re back on the internet! Let’s push our changes to origin/master and see what happens. Type:
git push origin master
 |
| Fig. 40 |
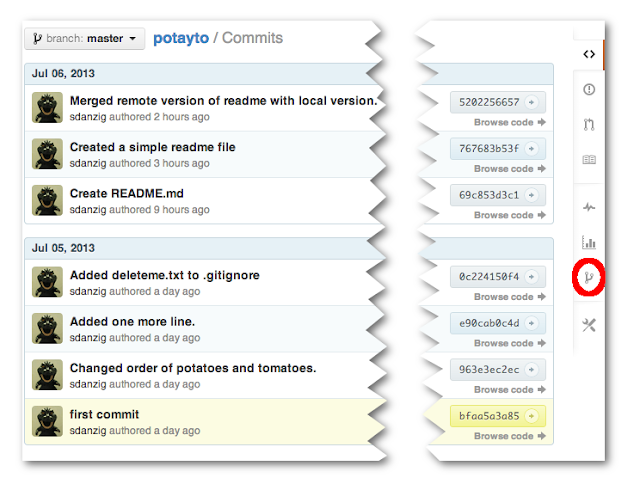
Now, just to be sure, we’re not going to look at the “local version” of the remote branch. Let’s go right to Github to see what happened. View the commits in your repository:
 |
| Fig. 41 |
What might not make sense here, is that you have first the Github-side readme commit, then your local readme commit,
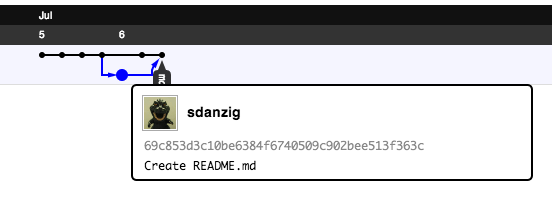
then the merge. It doesn’t make sense for all of these commits to happen in sequence, since the first two are conflicting. What happens is that your local readme file commit is logged as a commit on a separate branch that is merged in. Let’s graphically demonstrate that by clicking on the “Network” button on the right (circled in red).
 |
| Fig. 42 |
Each dot in this diagram represents a commit. Later commits are on the right. The one that looks like it was committed to a separate branch (your local master branch) and then
merged in is the commit of your local version of the readme file. Hover over this dot and see for yourself.
It’s good to pull in remote changes not too infrequently, to minimize the complexity of conflicts.Rebasing
This is as advanced as this tutorial is going to get, and you’re in the homestretch! Rebasing is meant to give you that clean, fresh feeling when committing your changes. With it, you can shape your commits how you prefer before merging them to another branch. But wait, you might think… You can already do that when you’re staging your files. You can stage and unstage files repeatedly, getting a commit exactly how you want. There are two main things that rebasing lets you do in addition to that.
Let’s say you were working on branch A and you created branch B.
Branch B is nothing more than a series of changes made to a specific version of branch A (starting with a specific commit in branch A). Let’s say you were able to take those changes and reapply them to the last commit in branch A. It’s as though you checked out branch A and you made the same changes. Read this paragraph as many times as you need to before you move on.
Remember when I mentioned about fast-forward commits? When you viewed the commit history on Github, did you like seeing commits on other branches being merged in? Or would you have preferred one commit after another? Most prefer the latter. Merging can get quite messy in a worst-case scenario, but even if it’s not so bad, it’s not preferable. You can use rebasing to allow your merges to be “fast-forward”, so when you merge your changes into another branch, there’s no “merge commit”. Your changes are simply added as the next commits in the target branch, and the new latest commit of that branch is your last change.
Let’s demonstrate before I talk about the next benefit. I explained how to create and switch to local branches at the end of the “Branches” section. Type:
git branch testing
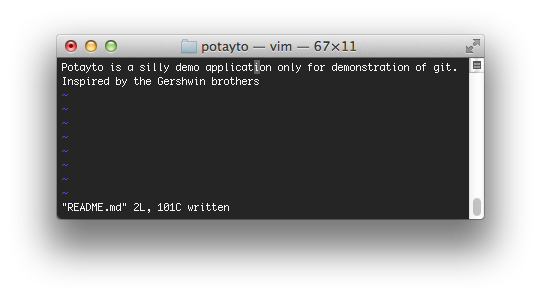
We’re still in the master branch. Now let’s make another change to that awful readme file again. Load up your editor and add the line: “Inspired by the Gershwin brothers” then save:
 |
| Fig. 43 |
If you type “git status”, you’ll see the only modification is to the readme file. A shortcut I didn’t tell you about, to stage and commit all modified files at the same time,
if all the modified files have already been staged once (they’re not “untracked”), is by using git commit’s “a” flag:
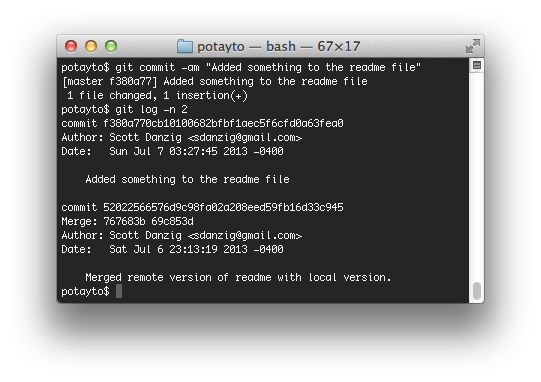
git commit -am “Added something to the readme file”
then view the log with:
git log -n 2
 |
| Fig. 44 |
There’s our change, right after our merge commit. We’re not going to make the mistake of adding any more messy merge commits. Type:
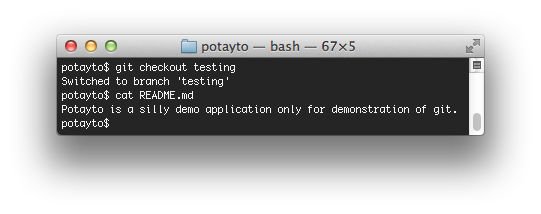
git checkout testing
and then view the README.md file:
 |
| Fig. 45 |
You see that your modification is no longer there. I’d have you modify the readme file again, but I think I’m done explaining conflict resolution. If you did modify readme, and then you wanted to reapply your changes over the latest version of the master branch, you’d have another bloody conflict to resolve. Let’s just create a change in our source code.
Edit the file “src/main/scala/scottdanzig/potayto/Potayto.scala” and add the printing of “Ding!” as shown. Please, just humor me…
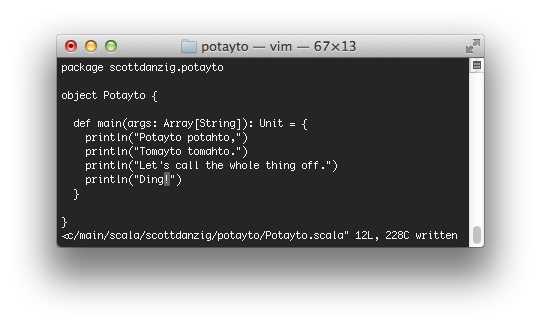 |
| Fig. 46 |
Now stage and commit:
git commit -am “Added the printing of Ding”
then show the last two changes for both the current “testing” branch and the “master” branch with:
git log -n 2 <branch>
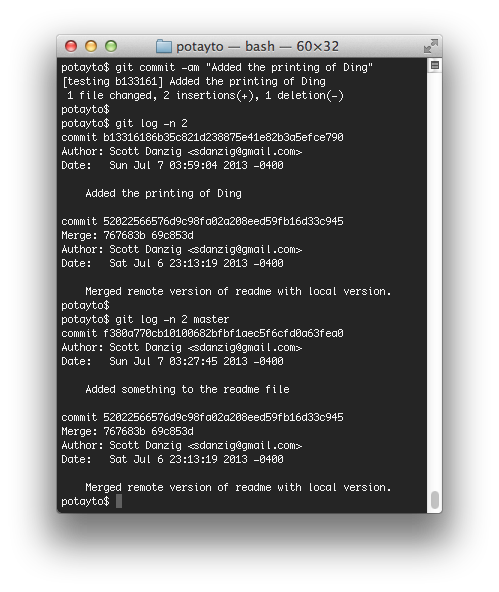 |
| Fig. 47 |
There be a storm a-brewin’! Hang in there! If you merged the testing branch into master now, you’d again see your change added to the master branch, followed by a merge commit. Wouldn’t it be simple if we can recreate testing from the current version of master, then automatically make your change again for you? Then you’d only be adding your “Added the printing of Ding” commit. You can do just that right now. Type:
git rebase master
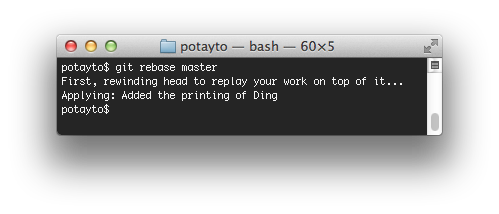 |
| Fig. 48 |
Git talks of “reapplying commits” as “replaying work”. How does it know which commits in your current branch to reapply/replay? It traverses down the branch, starting with the most recent commit, and finds the first commit that is in the master branch. Now let’s see the log:
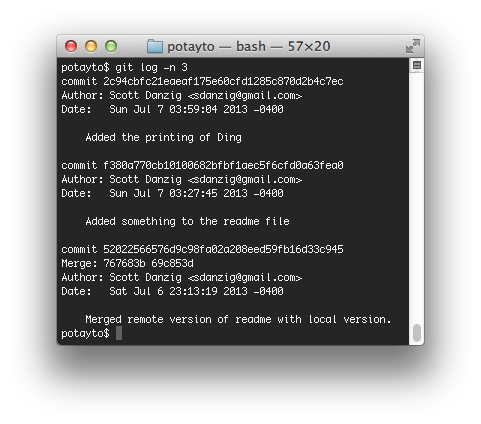 |
| Fig. 49 |
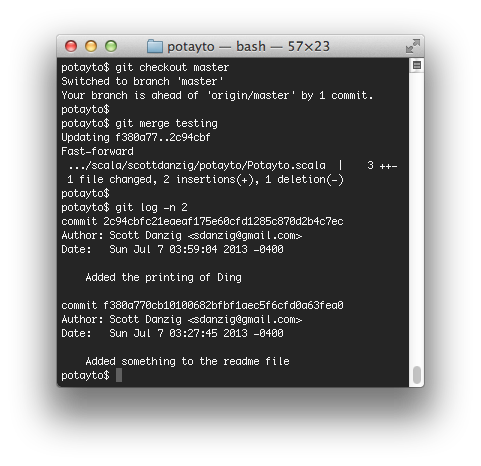
See? It’s exactly what I described. It’s as though you waited for that last change to master to be made before branching. Now see how easy it is to merge in your changes by switching to the master branch and doing the merge:
 |
| Fig. 50 |
A fast-forward merge is
so easy.
I mentioned there are
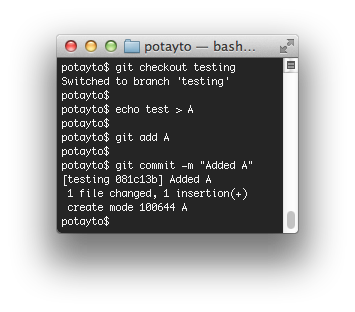
two things rebasing lets you do that you can’t do just with staging. There’s this notion of “interactive rebasing” that I think is the coolest part of git. This is the last part of the tutorial where you have to do anything, so this is the homestretch of the homestretch. Now we’re going back to our testing branch (currently the same as master) and create two new files, A and B. I’m going to keep this simple. Type:
git checkout testing
then:
echo test > A
and stage and commit that change. File “A” is new/untracked, so you can’t use the “-am” shortcut:
git add A
and then:
git commit -m “Added A”
 |
| Fig. 51 |
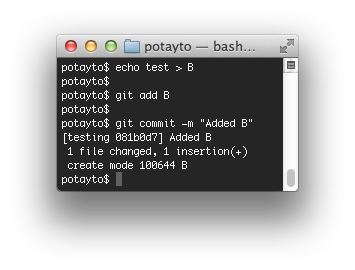
Now create another file, B:
echo test > B
and stage then commit as well:
git add Bgit commit -m “Added B”
 |
| Fig. 52 |
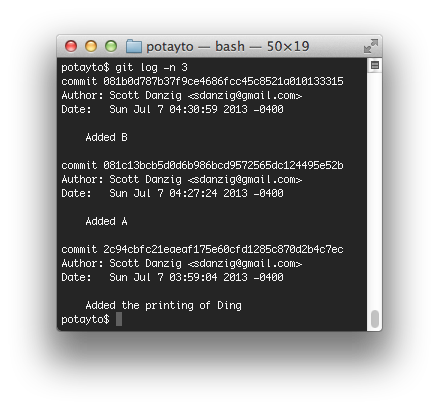
You’ll see both of those commits in the log:
 |
| Fig. 53 |
Okay, we’re all set to show off interactive rebasing. We’re going to combine those two commits you just did into one commit. You have two options:
- You can do this in the same branch, if you just want to reorganize a branch while you’re working with it.
- You can also combine commits when you’re rebasing (reapplying/replaying) them onto another branch.
If you don’t think this is the bees knees, you’re nuts. We’re going to do the rebasing the second way, while rebasing onto master. The latest change on master is contained in the testing branch, so rebasing just to avoid merge commits would be unnecessary. Merging testing into master would be a fast-forward merge. However, we’re also going to use this opportunity to combine the two commits. Rebasing can be multi-purpose that way. Type:
git rebase -i master
 |
| Fig. 54 |
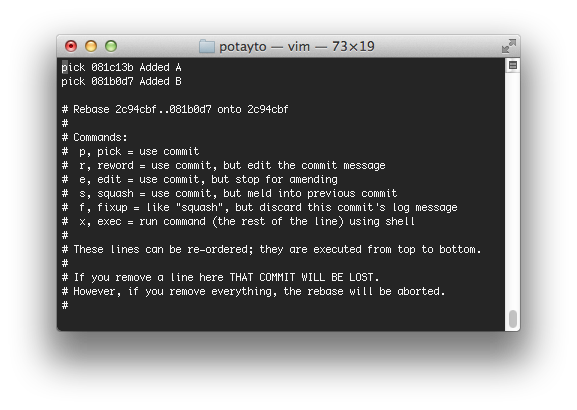
Git might scare you with a vim editor window like this. You see those two “pick” lines at the top? This is a list of the commits that are going to be reapplied, with the oldest change on top. If you change an instance of the word “pick” to “squash”, the commit listed on that line will get combined/melded into the older commit above it. You need the oldest commit you want to reapply to be a “pick”. You can use “p” and “s” instead of “pick” and “squash” by the way. If you want, you can even remove some commits from this list all together, but be careful. That effectively removes all record of that commit from the current branch. Oh look! It even warns you in ominous CAPITAL LETTERS.
Let’s change the second “pick” to a “squash”. It’s possible to change your default editor from “vim” if you want, but if you prefer vim like me or just haven’t got around to it yet, just heed my instructions:
Use the arrow keys to move the cursor to the “p” of the second “pick”.
- Type “cw” to change the word.
- Type “s” then press the escape button.
- Type “:x” to exit and save.
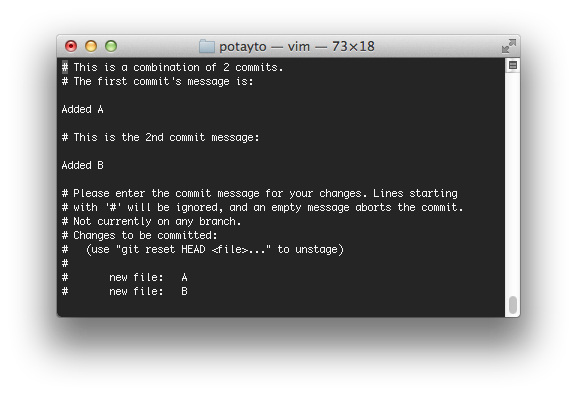
Now you should see a screen allowing you to create the new commit message:
 |
| Fig. 55 |
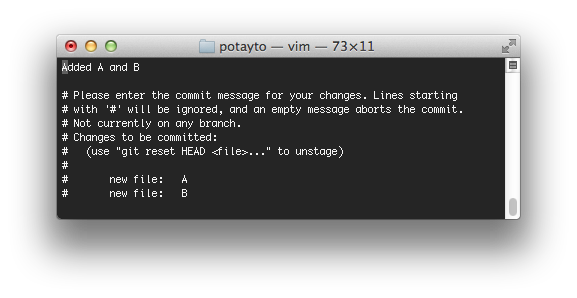
This gives you the opportunity to write the new description, perhaps multi-lined for the combined commit. By default, Git will just put all the combined commit messages one after the other. If you want, you can accept that and just type “:x” to exit and save. Or, you can use vim to modify the file to your liking. If you want to give it a shot, just press “i” to go into insert mode, then use the arrows to move around and backspace to delete. When you’re done, press the escape key then type “:x”. Here’s my modified file:
 |
| Fig. 56 |
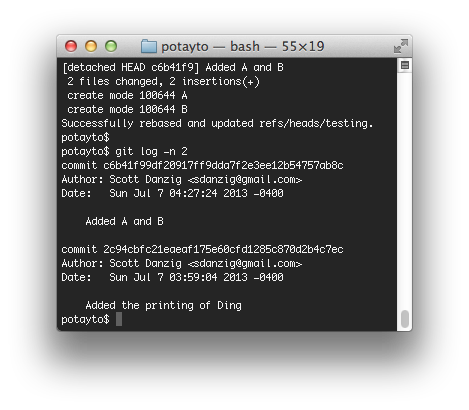
I could have ignored the lines starting with #, but I got rid of some of them for clarity. Here’s what the log looks like after I saved and exited:
 |
| Fig. 57 |
See the one big commit? That “printing of Ding” commit afterward is the latest commit currently in the master branch, so merging the testing branch into master would be a fast-forward merge. I’d demonstrate that, but I’d rather avoid redundancy and finish the tutorial.
Pull Requests
Commits are often grouped into “feature branches”, representing all the changes needed for a branch. How projects with designated maintainer(s) often operate is as follows:
- You push your “feature branch” to a remote repository, often your fork of the main repository.
- You create a “pull request” on Github for that branch, which tells the project maintainer that you want your branch merged into the master branch.
- If the branch is recent enough where it’s spawned from the most recent commit on the project’s master branch, or it can be rebased onto master without any conflicts, the maintainer can easily merge in your changes.
- If there are conflicts, then it’s up to the maintainer to do the merge, or to reject the pull request and let you rebase and deconflict the commits in your branch yourself.
New York Magazine Development Environment
At New York Magazine, where I work, we generally have 4 main branches of each project entitled dev, qa, stg, prod. We have software called
Jenkins that monitors each branch, and when any change is made, the project is redeployed to a computer/server dedicated to that environment.


.png)